Instrument Fingerings on our Band & Orchestra Flashcards
Our fingering graphics are beautiful and packed with information. Note names are displayed intuitively on each instrument or attached to the key finger for each pitch. You will not find a more attractive or powerful fingering chart anywhere!
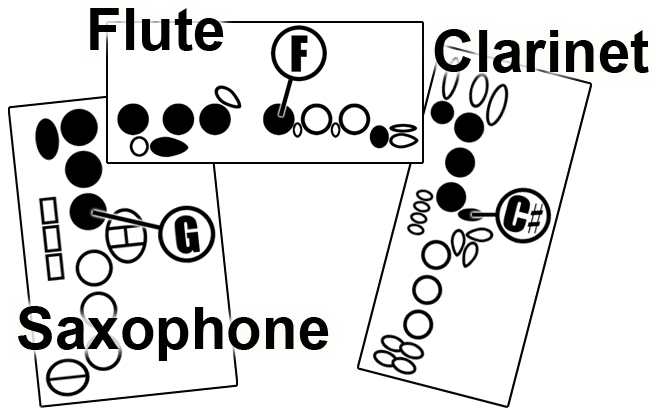
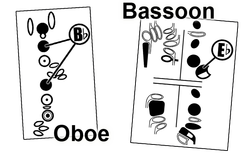
Woodwind FingeringsAll woodwind instruments are shown with the filled-in tone holes representing the keys that are pressed down. Note names are attached to the "key finger" for that specific pitch.
|
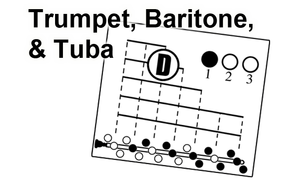
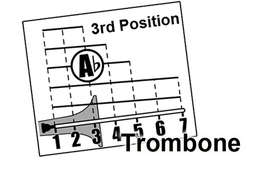
Brass FingeringsAll brass fingerings show the valve fingering (or slide position), tube length, AND partial. They are revolutionary, and with just a little explanation are extremely informative and powerful.
|
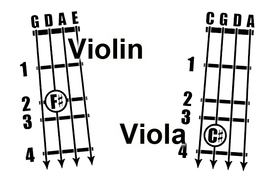
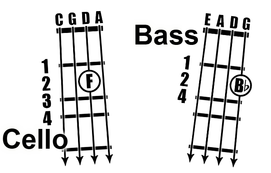
String FingeringsAll string instrument fingerings show PRECISELY where the finger is placed, but allows teachers to use their own terminology (for example, "high 3rd" vs. "extended 3rd").
|
Explanation of Brass Fingering Graphics
|
|
Creating a More Intuitive Fingering Chart
How do you make a more intuitive, meaningful fingering chart? You take an idea, and you try it with kids and see what they think, of course. Sometimes they love an idea, and sometimes they send you back to the drawing board. Through years of doing exactly this with my beginning band and orchestra students, I've developed instrument fingering charts that work extremely well with beginners.
Let's start with the string fingering chart. If you search the web for them you find both vertical and horizontal orientations. Horizontal seems like it would make the most sense, since violin players hold their instruments horizontally. However, most students prefer the vertical orientation, because when they hold the violin fingerboard towards themselves, they hold the violin vertically. It is just more intuitive that way, apparently. Once I tested a violin fingering chart that had dashed lines between the tapes (in other words, where the low 1, low 2, and high 3/low 4 notes are). I thought it would make the exact finger placement more clear. Nope! The students didn't like it, and just wanted to see where the tapes are. Period. Simple, and less cluttered is desirable, apparently.
I also tested "black dots" compared to note names placed on the fingerboard of the fingering chart. The kids strongly preferred seeing the note names. So, then I tried note names alone compared to note names in a square frame and note names in a circular frame. The kids like the circles! I think as you compare the StepWise fingering charts and flash cards to others you will see how attractive and kid-friendly they are. This means more intuitive meaning and more learning!
Let's talk about woodwind fingering charts. The StepWise flute fingering chart, for example, was created with concern for three things: 1. does the chart look like a flute, 2. do the graphics look clean and neat, and 3. can the students see what key is considered THE key for each particular note. The clarinet fingering chart is similarly set up, with attractive, realistic (but simplistic) clarinet keys. The beginning students LOVE that each note name is attached to the key that most critical to that note.
The StepWise saxophone fingering charts are also set up this way. Another feature of all the woodwind fingering charts is that the note names are shown according to their relative pitch. This means that, while the saxophone fingering for F# uses a "lower" key than the F natural, the F# note name is shown in a higher position along the side of the sax fingerings, to denote that it is "higher" than the F natural . The kids are able to intuitively make more sense of both the musical pitches and the fingerings on their instruments because of this feature.
Lastly, all of the StepWise brass fingering charts were created with guidance and input from genuine beginning band students. I was tired of kids being constantly confused about knowing how high or low any written note was supposed to be played. Once I began using the word "partial" consistently in my beginning band classes, the question from students was often, "What partial is this note on?" You see, kids who lack a strong musical background can't intuitively figure out how high a note should sound based on what line or space it occupies on the staff. But, if I tell them that a note is on the 3rd partial, they can finger the note then start at the lowest partial and work their way up to the 3rd. However, I got sick, sick, sick of the question, "What partial is this note on?"
So, I began experimenting with different ways of representing the partials on each brass instrument's fingering chart. With input from the kids, I devised a way of showing the fingering and partial of each note in a simple graphic. Of course, someone who is used to seeing only "1 & 3" will think the StepWise trumpet fingering chart is confusing. But, with a little explanation, all of my beginning trumpet players light up with understanding and confidence. After a short introduction to the graphical representation of tube lengths and partials, the trumpet, baritone, tuba, and trombone fingerings really are intuitive and easy to use. The trombone fingering chart was a special challenge, but I am delighted with the final results, and I think it is the most attractive of the brass charts.
Don't diss these fingering charts until you try them with beginners. If you TRY them you might just be AMAZED at how well your students respond, and how easily they are able to make sense of their instruments. What was once confusing and illogical will make sense and become much easier to memorize. Give them a try!